Android login with php and display data in custom listview.


This is project in Android login with php and display data in custom listview.

Processing: 

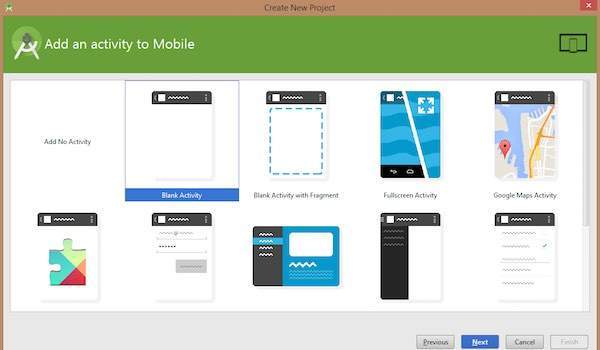
Start Login with app and if password have in database, it open new activity and display data in custom listview.

Create Database In phpmyadmin.

USE db_client2;
CREATE TABLE tbl_product(pid INTEGER PRIMARY KEY AUTO_INCREMENT NOT NULL,name VARCHAR(200) NOT NULL,qty int NOT NULL,price float NOT NULL,image_url text NOT NULL);


Insert Data to tbl_product

INSERT INTO tbl_product(name, qty, price,iamge_url)VALUES('name_valuse', 'number_qty', 'price_of_qty,iamge_of_url');

connection.php

<?php
$servername = "localhost"; //replace it with your database server name
$username = "root";  //replace it with your database username
$password = "";  //replace it with your database password
$dbname = "db_client2";
// Create connection
$conn = mysqli_connect($servername, $username, $password, $dbname);
// Check connection
if (!$conn) {
    die("Connection failed: " . mysqli_connect_error());
}
?>

login.php


<?PHP
    include_once("connection.php");
    if( isset($_POST['txtUsername']) && isset($_POST['txtPassword']) ) {
        $username = $_POST['txtUsername'];
        $password = $_POST['txtPassword'];
        $query = "SELECT username, password FROM tbl_client ".
        " WHERE username = '$username' AND password = '$password'";
        $result = mysqli_query($conn, $query);
   
        if($result->num_rows > 0){     
                echo "success";
                exit;                     
        } else{
             echo "Login Failed <br/>";
             exit;
        }
    }
?>
<html>
<head>
    <title>Login | Vichit </title>
</head>
    <body>
        <h1>Login Example|<a href="https://www.youtube.com/channel/UCkIW6gubyhq_17tUI6Qgjog">Vichit Developer Android</a></h1>
        <form action="<?PHP $_PHP_SELF ?>" method="post">
            Username <input type="text" name="txtUsername" value="" /><br/>
            Password <input type="password" name="txtPassword" value="" /><br/>
            <input type="submit" name="btnSubmit" value="Login"/>
        </form>
    </body>
</html>

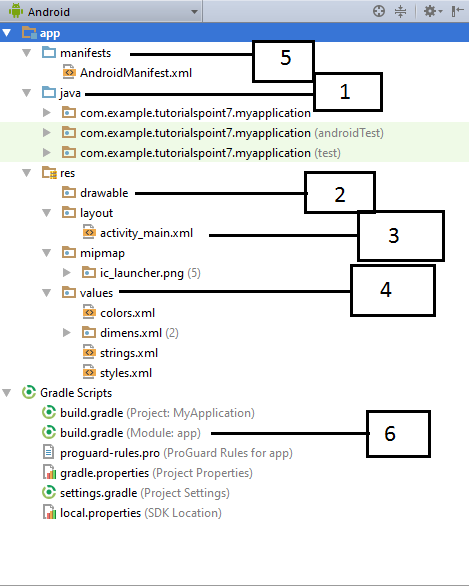
In Android: need to add more Library


Go to Project >> app>>libs>>past 3 library in to libs Right click on library and than click add as library

MainActivity


 you need write some code in method onlick' button

btnLogin.setOnClickListener(new View.OnClickListener() {
    @Override    public void onClick(View v) {
        HashMap postData = new HashMap();

        String username = edusername.getText().toString();
        String password = edpassword.getText().toString();

        postData.put("txtUsername", username);
        postData.put("txtPassword", password);


        PostResponseAsyncTask task = new PostResponseAsyncTask(MainActivity.this, postData,
                new AsyncResponse() {

                    @Override                    public void processFinish(String s) {
                        //Log.d(LOG,s);                        if (s.contains("success")) {
                            Intent intent = new Intent(MainActivity.this,ListActivity.class);
                            startActivity(intent);
                            Toast.makeText(MainActivity.this, "Login Successfully", Toast.LENGTH_SHORT).show();
                        } else {
                            Toast.makeText(MainActivity.this, "Disconnect + /n Please try again", Toast.LENGTH_SHORT).show();
                        }
                    }

                });
        task.execute("http://10.0.3.2/client/login");
    }
});


Explain:

http://localhost/client/login >> if you work in php browser, you must to declare this.
http://10.0.3.2/client/login >> if you work in Genymotion, you must to declare this.

Product Class:

This class, if in java we call it Getter and Setter but in android get data from Json we don't use getter 
and setter. We use @SerializedName

public class Product { @SerializedName("pid") public int pid;

@SerializedName("name") public String name;

@SerializedName("qty") public int qty;

@SerializedName("price") public float price;

@SerializedName("image_url") public String image_url; }

ListActivity:

declare variable:

final String LOG = "ListActivity";
private ArrayList<Product> productsList;
private ListView listProduct;


OnCreate method: 
PostResponseAsyncTask task = new PostResponseAsyncTask(ListActivity.this, this);
task.execute("http://10.0.3.2/client/product.php");


When you make PostResponseAsyncTask, It generator one method to us. 


processFinish
You can read my command my note on code

productsList = new JsonConverter<Product>().toArrayList(s, Product.class);
BindDictionary<Product> dist = new BindDictionary<>();

//Get Name from Product Class
dist.addStringField(R.id.tvName, new StringExtractor<Product>() {

@Override public String getStringValue(Product product, int position) { return product.name; } }); //Get Qty from Product Classdist.addStringField(R.id.tvQty, new StringExtractor<Product>() { @Override public String getStringValue(Product product, int position) { return product.qty + ""; } }); //Get Price from Product Classdist.addStringField(R.id.tvPrice, new StringExtractor<Product>() { @Override public String getStringValue(Product product, int position) { return product.price + "$"; } }); //Get image from Product Classdist.addDynamicImageField(R.id.imageView, new StringExtractor<Product>() { @Override public String getStringValue(Product product, int position) { return product.image_url; } }, new DynamicImageLoader() { @Override public void loadImage(String url, ImageView imageView) { Picasso.with(ListActivity.this).load(url).into(imageView); } }); FunDapter<Product> adapter = new FunDapter<>(ListActivity.this,productsList,R.layout.layout_list,dist); listProduct = (ListView) findViewById(R.id.lvListView); listProduct.setAdapter(adapter);

One of problem that we want to call Image: 
Before we call method loadImage, We must to declare: compile 'com.squareup.picasso:picasso:2.5.2'
Go to bulid.gradle and write


Atfer finish declare. It we show you one problem in Android Monitor. Show this problem we can fix it.
Go to AndroidManifest and add some tools:

xmlns:tools="http://schemas.android.com/tools"
tools:replace="@android:icon"


Editor by: Vichit Developer.

Android Login connect with php MySQL.


This is project connection with php using mysql database.

Create database in phpmyadmin(Mysql)


USE db_client;
CREATE TABLE tbl_client2(id INTEGER PRIMARY KEY AUTO_INCREMENT NOT NULL,name VARCHAR(50) NOT NULL,username VARCHAR(50) NOT NULL,password VARCHAR(50) NOT NULL);


Insert data into tbl_client2


INSERT INTO tbl_client2(name, username, password)VALUES('abc', 'abc', '123');INSERT INTO tbl_client(name, username, password)VALUES('Test', 'test', 'test');


Connection.php


<?php

$servername = "localhost"; //replace it with your database server name
$username = "root";  //replace it with your database username
$password = "";  //replace it with your database password
$dbname = "db_client2";
// Create connection
$conn = mysqli_connect($servername, $username, $password, $dbname);
// Check connection
if (!$conn) {
    die("Connection failed: " . mysqli_connect_error());
}
?>


login.php


<?PHP 
    include_once("connection.php"); 
    if( isset($_POST['txtUsername']) && isset($_POST['txtPassword']) ) { 
        $username = $_POST['txtUsername'];
        $password = $_POST['txtPassword'];

        $query = "SELECT username, password FROM tbl_client ". 
        " WHERE username = '$username' AND password = '$password'"; 

        $result = mysqli_query($conn, $query);
        
        if($result->num_rows > 0){
            //if(isset($_POST['mobile']) && $_POST['mobile'] == "android"){ 
                echo "success"; 
                exit; 
          //  } 
            //echo "Login successful"; 
                           
        } else{ 
             echo "Login Failed <br/>";
             exit;
        } 
    }
?>
<html>
<head>

    <title>Login | Vichit </title>
</head>
    <body>
        <h1>Login Example|<a href="https://www.youtube.com/channel/UCkIW6gubyhq_17tUI6Qgjog">Vichit Developer Android</a></h1>
        <form action="<?PHP $_PHP_SELF ?>" method="post">
            Username <input type="text" name="txtUsername" value="" /><br/>
            Password <input type="password" name="txtPassword" value="" /><br/>
            <input type="submit" name="btnSubmit" value="Login"/>
        </form>
    </body>
</html>


In AndroidManifest you must add:

 <uses-permission android:name="android.permission.INTERNET" />


In Android you must add Jar Library:


-Go to Project -> app -> libs -> past library into libs 
-Right click on Gson.jar -> add as library 


MainActivity 

You must write some code:@Override
public void onClick(View v) {
    HashMap postData = new HashMap();
    postData.put("mobile", "android");
    postData.put("txtUsername" , edUsername.getText().toString());
    postData.put("txtPassword" , edPassword.getText().toString());

    PostResponseAsyncTask task = new PostResponseAsyncTask(this,postData);
    task.execute("http://10.0.3.2/client/login.php");

}


http://localhost/client/login.php : if you work in php bowers, you need to declare  this

http://10.0.3.2/client/login.php : if you work in Genymotion, you need to declare this.

http://10.0.3.2/client/login.php : default 


when you Make PostResponseAsyncTask, it will give you a Override one method (processFinish).
The mehtod, It mean that when the android processing, it call method to use.


@Overridepublic void processFinish(String result) {
    if (result.equals("success")){
        Intent intent = new Intent(MainActivity.this,MyAppActivity.class);
        startActivity(intent);
        //Toast.makeText(this,"Login Successfully",Toast.LENGTH_SHORT).show();    }else{
        Toast.makeText(this,"Login Failed",Toast.LENGTH_SHORT).show();
    }

}

Editor by: Vichit Pov


JSON Jar Library for connect PHP MYSQL.

Simplify Adapter creation for your Android ListViews. (FunDapter Class)


FunDapter takes the pain and hassle out of creating a new Adapter class for each ListView you have in your Android app.
It is a new approach to custom adapter creation for Android apps. You get free ViewHolder pattern support, field validation so you don't get bit by trivial bugs and best of all - you get to keep it DRY!

What's new?

  1. Gradle support now only contains a JAR archive instead of AAR which wasn't needed. Just add compile 'com.github.amigold.fundapter2:library:1.01' to your dependencies in the build.gradle file in your project.

What you used to do:

  1. Subclass BaseAdapter or copy existing adapter you already wrote.
  2. Create a ViewHolder static class a define all the views in it.
  3. Write (Copy.. don't fool yourself!) the whole ViewHolder creation code from somewhere.
  4. Write all the "findViewById" lines.
  5. Start filling data in the views inside the getView method.
Well that was boring! I feel your pain!

What FunDapter lets you do:

  1. Create a new BindDictionary
  2. Add fields.
  3. Create a new FunDapter instance, supplying the BindDictionary, layout resource file and item list.

Getting Started

This is the Product class we'll create an adapter for:
public class Product {
 
 public String title;
 public String description;
 public String imageUrl;
 public double price;
}

Create a new BindDictionary instance:

BindDictionary<Product> dict = new BindDictionary<Product>();

Adding a basic text field:

dict.addStringField(R.id.description,
 new StringExtractor<Product>() {

     @Override
     public String getStringValue(Product item, int position) {
   return item.description;
     }
 });
Notice how you simply provide the id of the TextView and an implementation of the StringExtractor which will be used to get the correct String value from your Product.

Now a more complicated text field:

dict.addStringField(R.id.title,
 new StringExtractor<Product>() {

     @Override
     public String getStringValue(Product item, int position) {
   return item.title;
     }
 }).typeface(myBoldFace).visibilityIfNull(View.GONE);
Notice how you can chain calls to get some more complex behaviours out of your views. typeface() will set a typeface on the view while visibilityIfNull() will change the visibility of the field according to the value being null or not.

What about our image?? Lets add that as well:

prodDict.addDynamicImageField(R.id.productImage,
 new StringExtractor<Product>() {

     @Override
     public String getStringValue(Product item, int position) {
   return item.imageUrl;
     }
 }, new DynamicImageLoader() {
     @Override
     public void loadDynamicImage(String url, ImageView view) {
   //insert your own async image loader implementation
     }
 });
In here the StringExtractor grabs the URL from the Product item while the ImageLoader gives you a reference to the view and the URL you extracted so you can use your own custom lazy image loading implementation.

Finally, create the adapter:

FunDapter<Product> adapter = new FunDapter<Product>(getActivity(), productArrayList,
  R.layout.product_list_item, dict);

What is supported so far:

  • ViewHolder pattern and more performance optimizations
  • Switching data using funDapter.updateData()
  • Alternating background colors for the list items. Use funDapter.setAlternatingBackground()
  • Text fields:
    • typeface
    • visibility if null
    • changing textcolor based on a boolean condition - chain conditionalTextColor() when setting the field
  • Image fields (that load from the web)
  • ProgressBar fields - for showing user progress or xp.
  • Conditional visibility views - views that are shown or hidden according to some boolean value. (Good for decorations such as "sale" banners)
  • All fields support setting an OnClickListener by chaining onClick()
  • ExpandableListAdapter is supported

What next?

  • Support for ViewPagerAdapter
  • Support for Favorite toggle buttons (where you provide your own implementation for the data persistence)
  • Whatever else I can think of!

Gradle Support

Just add compile 'com.github.amigold.fundapter:library:1.0' to your dependencies in the build.gradle file in your project.

License

(The MIT License)
Copyright (c) 2012-2013 Ami Goldenberg ami.gold.dev@gmail.com
Permission is hereby granted, free of charge, to any person obtaining a copy of this software and associated documentation files (the 'Software'), to deal in the Software without restriction, including without limitation the rights to use, copy, modify, merge, publish, distribute, sublicense, and/or sell copies of the Software, and to permit persons to whom the Software is furnished to do so, subject to the following conditions:
The above copyright notice and this permission notice shall be included in all copies or substantial portions of the Software.
THE SOFTWARE IS PROVIDED 'AS IS', WITHOUT WARRANTY OF ANY KIND, EXPRESS OR IMPLIED, INCLUDING BUT NOT LIMITED TO THE WARRANTIES OF MERCHANTABILITY, FITNESS FOR A PARTICULAR PURPOSE AND NONINFRINGEMENT. IN NO EVENT SHALL THE AUTHORS OR COPYRIGHT HOLDERS BE LIABLE FOR ANY CLAIM, DAMAGES OR OTHER LIABILITY, WHETHER IN AN ACTION OF CONTRACT, TORT OR OTHERWISE, ARISING FROM, OUT OF OR IN CONNECTION WITH THE SOFTWARE OR THE USE OR OTHER DEALINGS IN THE SOFTWARE.

Hello World - Android for beginner

Let us start actual programming with Android Framework. Before you start writing your first example using Android SDK, you have to make sure that you have set-up your Android development environment properly as explained in Android - Environment Set-up tutorial. I also assume that you have a little bit working knowledge with Android studio.
So let us proceed to write a simple Android Application which will print "Hello World!".

Create Android Application

The first step is to create a simple Android Application using Android studio. When you click on Android studio icon, it will show screen as shown below
Hello Android Wizard
You can start your application development by calling start a new android studio project. in a new installation frame should ask Application name, package information and location of the project.−
Hello Android Project
After entered application name, it going to be called select the form factors your application runs on, here need to specify Minimum SDK, in our tutorial, I have declared as API23: Android 6.0(Mashmallow) −
Hello Android Project
The next level of installation should contain selecting the activity to mobile, it specifies the default layout for Applications.
Hello Android Project
At the final stage it going to be open development tool to write the application code.
Hello Android Project

Anatomy of Android Application

Before you run your app, you should be aware of a few directories and files in the Android project −
Android Directory Structure
Sr.No.Folder, File & Description
1
Java
This contains the .java source files for your project. By default, it includes an MainActivity.java source file having an activity class that runs when your app is launched using the app icon.
2
res/drawable-hdpi
This is a directory for drawable objects that are designed for high-density screens.
3
res/layout
This is a directory for files that define your app's user interface.
4
res/values
This is a directory for other various XML files that contain a collection of resources, such as strings and colours definitions.
5
AndroidManifest.xml
This is the manifest file which describes the fundamental characteristics of the app and defines each of its components.
6
Build.gradle
This is an auto generated file which contains compileSdkVersion, buildToolsVersion, applicationId, minSdkVersion, targetSdkVersion, versionCode and versionName
Following section will give a brief overview few of the important application files.

The Main Activity File

The main activity code is a Java file MainActivity.java. This is the actual application file which ultimately gets converted to a Dalvik executable and runs your application. Following is the default code generated by the application wizard for Hello World! application −
package com.example.helloworld;

import android.support.v7.app.AppCompatActivity;
import android.os.Bundle;

public class MainActivity extends AppCompatActivity {
   @Override
   protected void onCreate(Bundle savedInstanceState) {
      super.onCreate(savedInstanceState);
      setContentView(R.layout.activity_main);
   }
}
Here, R.layout.activity_main refers to the activity_main.xml file located in the res/layout folder. The onCreate() method is one of many methods that are figured when an activity is loaded.

The Manifest File

Whatever component you develop as a part of your application, you must declare all its components in a manifest.xml which resides at the root of the application project directory. This file works as an interface between Android OS and your application, so if you do not declare your component in this file, then it will not be considered by the OS. For example, a default manifest file will look like as following file −
<?xml version="1.0" encoding="utf-8"?>
<manifest xmlns:android="http://schemas.android.com/apk/res/android"
    package="com.example.tutorialspoint7.myapplication">

   <application
      android:allowBackup="true"
      android:icon="@mipmap/ic_launcher"
      android:label="@string/app_name"
      android:supportsRtl="true"
      android:theme="@style/AppTheme">
      
      <activity android:name=".MainActivity">
         <intent-filter>
            <action android:name="android.intent.action.MAIN" />
            <category android:name="android.intent.category.LAUNCHER" />
         </intent-filter>
      </activity>
   </application>
</manifest>
Here <application>...</application> tags enclosed the components related to the application. Attribute android:icon will point to the application icon available under res/drawable-hdpi. The application uses the image named ic_launcher.png located in the drawable folders
The <activity> tag is used to specify an activity and android:name attribute specifies the fully qualified class name of the Activity subclass and the android:label attributes specifies a string to use as the label for the activity. You can specify multiple activities using <activity> tags.
The action for the intent filter is named android.intent.action.MAIN to indicate that this activity serves as the entry point for the application. The category for the intent-filter is named android.intent.category.LAUNCHER to indicate that the application can be launched from the device's launcher icon.
The @string refers to the strings.xml file explained below. Hence, @string/app_name refers to the app_name string defined in the strings.xml file, which is "HelloWorld". Similar way, other strings get populated in the application.
Following is the list of tags which you will use in your manifest file to specify different Android application components −
  • <activity>elements for activities
  • <service> elements for services
  • <receiver> elements for broadcast receivers
  • <provider> elements for content providers

The Strings File

The strings.xml file is located in the res/values folder and it contains all the text that your application uses. For example, the names of buttons, labels, default text, and similar types of strings go into this file. This file is responsible for their textual content. For example, a default strings file will look like as following file −
<resources>
   <string name="app_name">HelloWorld</string>
   <string name="hello_world">Hello world!</string>
   <string name="menu_settings">Settings</string>
   <string name="title_activity_main">MainActivity</string>
</resources>

The Layout File

The activity_main.xml is a layout file available in res/layout directory, that is referenced by your application when building its interface. You will modify this file very frequently to change the layout of your application. For your "Hello World!" application, this file will have following content related to default layout −
<RelativeLayout xmlns:android="http://schemas.android.com/apk/res/android"
   xmlns:tools="http://schemas.android.com/tools"
   android:layout_width="match_parent"
   android:layout_height="match_parent" >
   
   <TextView
      android:layout_width="wrap_content"
      android:layout_height="wrap_content"
      android:layout_centerHorizontal="true"
      android:layout_centerVertical="true"
      android:padding="@dimen/padding_medium"
      android:text="@string/hello_world"
      tools:context=".MainActivity" />
      
</RelativeLayout>
This is an example of simple RelativeLayout which we will study in a separate chapter. The TextView is an Android control used to build the GUI and it have various attributes like android:layout_widthandroid:layout_height etc which are being used to set its width and height etc.. The @string refers to the strings.xml file located in the res/values folder. Hence, @string/hello_world refers to the hello string defined in the strings.xml file, which is "Hello World!".

Running the Application

Let's try to run our Hello World! application we just created. I assume you had created your AVD while doing environment set-up. To run the app from Android studio, open one of your project's activity files and click Run Eclipse Run Icon 
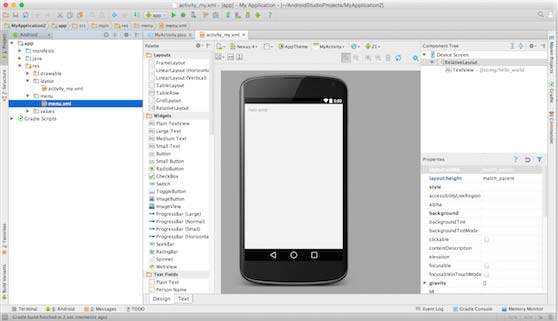
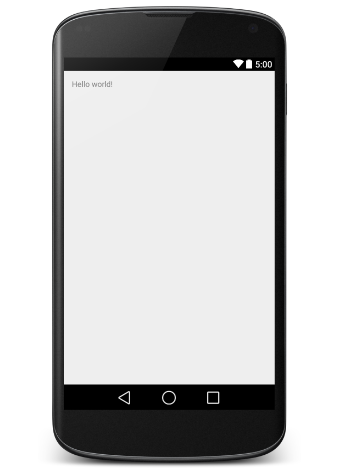
icon from the tool bar. Android studio installs the app on your AVD and starts it and if everything is fine with your set-up and application, it will display following Emulator window −
Android Hello World
Congratulations!!! you have developed your first Android Application and now just keep following rest of the tutorial step by step to become a great Android Developer. All the very best